https://corenxcrm2011fetchxmlexecuter.codeplex.com/
Showing posts with label CRM. Show all posts
Showing posts with label CRM. Show all posts
Monday, August 18, 2014

Wednesday, September 18, 2013
Microsoft Dynamics CRM 2011 Change Left Navigation Panel
Wednesday, August 28, 2013
Microsoft Dynamics CRM 2011 Add Entity 1:N Relation
salesorderdetailId -> retrieve salesorderdetail
salesorderId -> retrieve salesorder
EntityReferenceCollection relatedEntities = new EntityReferenceCollection
{
new EntityReference("salesorderdetail", salesorderdetailId)
};
//relation
Relationship relationship = new Relationship("order_details");
wf.OrganizationService.Associate("salesorder", salesorderId , relationship, relatedEntities);
salesorderId -> retrieve salesorder
EntityReferenceCollection relatedEntities = new EntityReferenceCollection
{
new EntityReference("salesorderdetail", salesorderdetailId)
};
//relation
Relationship relationship = new Relationship("order_details");
wf.OrganizationService.Associate("salesorder", salesorderId , relationship, relatedEntities);
Mİcrosoft Dynamics CRM 2011 Update Custom Workflow Assembly Step by Step
1. Open command prompt as administrator and execute iisreset
2. open services under administrator tools, restart Microsoft Dynamics CRM Asynchronous Processing Service (MSCRMAsyncService)
3. update assembly using pluginregistration tool in sdk bin folder
2. open services under administrator tools, restart Microsoft Dynamics CRM Asynchronous Processing Service (MSCRMAsyncService)
3. update assembly using pluginregistration tool in sdk bin folder
Tuesday, August 27, 2013
Microsoft Dynamics CRM 2011 SSRS Extension Installation does not display SSRS Instances
JUST Copy the SrsDataConnector folder to the SQL Server and install there.
Friday, August 23, 2013
Microsoft Dynamics CRM 2011 - Debug Plugin
1. Deploy the plug-in assembly.
Copy the assembly to the standard plug-in folder on the server: \Server\bin\assembly. If there is another copy of the assembly at the same location and you cannot overwrite that copy because it is locked by Microsoft Dynamics CRM, run the iisreset program in a command window to free the assembly.
1.1. Open Deployment Manager and your logged-in account must be added to the DEPLOYMENT ADMINISTRATORS to be able to debug your plug in on-disk.
2. Register the plug-in on the desired stage of the event execution pipeline. Register the plug-in assembly on the server using on-disk deployment.
Tip It is possible to debug a database deployed plug-in. The compiled plug-in assembly's .pdb file must be copied to the server's \Server\bin\assembly folder and IIS must then be restarted. After debugging has been completed, you must remove the .pdb file and reset IIS to prevent the w3wp.exe process from consuming additional memory.
Generally, you do not want to register your plug-in in the event execution pipeline until the plug-in assembly is available on the Microsoft Dynamics CRM server. If someone else is using Microsoft Dynamics CRM on the server, and you have registered the plug-in in but have not yet deployed the assembly, the person running Microsoft Dynamics CRM receives an error if the system tries to execute the missing plug-in.
3. Configure the debugger.
Set a breakpoint in your plug-in code. For an online plug-in, attach the debugger to the w3wp.exe process on the Microsoft Dynamics CRM server. For an offline plug-in, attach the debugger to the Microsoft.Crm.Application.Hoster.exe process. For asynchronous registered plug-ins (or workflow assemblies) attach to the CrmAsyncService.exe process. If there are multiple processes running for the same executable file, attach the debugger to all of them because you do not know which process runs your custom code.
4. Test the plug-in.
Run the Microsoft Dynamics CRM Web application, or other custom application that uses the SDK, and perform whatever action is required to cause the plug-in to execute. For example, if a plug-in is registered for an account creation event, create a new account.
5. Debug your plug-in code.
Make any needed changes to your code so that it performs as you want. If the code is changed, compile the code into an assembly and repeat step numbers 1, 3, and 4 in this procedure as necessary. However, if you change the plug-in assembly version number, you must unregister the earlier version of the assembly and register the new version.
6. Register the plug-in in the database.
After the edit/compile/deploy/test/debug cycle for your plug-in has been completed, unregister the (on-disk) plug-in assembly and then reregister the plug-in in the Microsoft Dynamics CRM database.
Thursday, August 22, 2013
Microsoft Dynamics CRM Debug a Plug-in Isolation State
http://www.resultondemand.nl/support/sdk/b4bbe405-a56f-450b-acd9-0c063cf35990.htm
Debug a Plug-in Isolation state |
| See Also |
The following steps describe how to debug a plug-in executing on Microsoft Dynamics CRM 2011 . To debug a plug-in that executes in the sandbox on Microsoft Dynamics CRM Online, you must using tracing as described later in this topic.
In This Topic
Debug a Plug-in
- Register and deploy the plug-in assembly.
If there is another copy of the assembly at the same location and you cannot overwrite that copy because it is locked by Microsoft DynamicsCRM, you must restart the service process that was executing the plug-in. Refer to the table below for the correct service process. For more information, see Register and Deploy Plug-ins. - Configure the debugger.
Attach the debugger to the process on the Microsoft DynamicsCRM server that will run your plug-in. Refer to the following table to identify the process.
Plug-in Registration Configuration Service Process online w3wp.exe offline Microsoft.Crm.Application.Hoster.exe asynchronous registered plug-ins (or custom workflow assemblies) CrmAsyncService.exe sandbox (isolation mode) Microsoft.Crm.Sandbox.WorkerProcess.exe
If there are multiple processes running the same executable, for example multiple w3wp.exe processes, attach the debugger to all instances of the running executable process. Next, set one or more breakpoints in your plug-in code. - Test the plug-in.
Run the Microsoft DynamicsCRM application, or other custom application that uses the SDK, and perform whatever action is required to cause the plug-in to execute. For example, if a plug-in is registered for an account creation event, create a new account. - Debug your plug-in code.
Make any needed changes to your code so that it performs as you want. If the code is changed, compile the code into an assembly and repeat steps 1 through 4 in this procedure as necessary. However, if you change the plug-in assemblys major or minor version numbers, you must unregister the earlier version of the assembly and register the new version. For more information, see Register and Deploy Plug-ins. - Register the plug-in in the database.
After the edit/compile/deploy/test/debug cycle for your plug-in has been completed, unregister the (on-disk) plug-in assembly and then reregister the plug-in in the Microsoft DynamicsCRM database. For more information, see Register and Deploy Plug-ins.
 Tip Tip |
|---|
| It is possible to debug a database deployed plug-in. The compiled plug-in assembly's symbol file (.pdb) must be copied to the server's <crm-root>\Server\bin\assembly folder and Internet Information Services (IIS) must then be restarted. After debugging has been completed, you must remove the symbol file and reset IIS to prevent the process that was executing the plug-in from consuming additional memory. |
Special Instructions for Debugging a Sandboxed Plug-in
It is important to perform these steps before the first execution of a sandboxed plug-in. If the plug-in has already been executed, either change the code of theassembly, causing the hash of the assembly to change on the server, or restart the Microsoft DynamicsCRM Sandbox Processing Service on the sandbox server.
Configure the Server
The sandbox host process monitors the sandbox worker process which is executing the plug-in. The host process checks if the plug-in stops responding, if it is exceeding memory thresholds, and more. If the worker process doesn't respond for than 30 seconds, it will be shutdown. In order to debug a sandbox plug-in, you must disable this shutdown feature. To disable the shutdown feature, set the following registry key to 1 (DWORD):
HKEY_LOCAL_MACHINE\SOFTWARE\Microsoft\MSCRM\SandboxDebugPlugins
| |
Debug the Plug-in
Follow these steps to debug a sandboxed plug-in.
- Register the plug-in in the sandbox (isolation mode) and deploy it to the Microsoft DynamicsCRM server database.
- Copy the symbol file of the compiled plug-in assembly to the server\bin\assembly folder on the server running the sandbox worker process.
- Follow the instructions in steps 2 through 4 presented at the beginning of this topic.
Logging and Tracing
An alternative method to debug a plug-in is to use tracing. Tracing assists developers in troubleshooting plug-ins by providing run-time plug-in information as an aid in diagnosing the cause of plug-in failure. Tracing is especially useful to debug Microsoft Dynamics CRM Online registered plug-ins as it is the only supported debugging method for that scenario.
The tracing discussed here is different from ASP.NET tracing. Tracing is implemented in the Microsoft DynamicsCRM SDK through the use of the tracing service ITracingService. Developers addTrace statements to their plug-in code, then build and deploy the plug-in. During execution and only when that plug-in passes an exception back to the platform at run-time, tracing information is displayed to the user. For a synchronous registered plug-in, the tracing information is displayed in a dialog of the Microsoft DynamicsCRM Web application. For an asynchronous registered plug-in, the tracing information is shown in the Details area of the System Job form in the Web application. The amount and nature of this information is up to you as a developer to code into your plug-ins.
The main reason for implementing this type of tracing is to support the isolated (sandboxed) plug-in and custom workflow activities capability in Microsoft DynamicsCRM. Sandboxed plug-ins are not able to write information to the system event log or the file system. Tracing was implemented to provide sandboxed plug-ins and custom workflow activities with a means to output run-time information when an exception is thrown. In addition, tracing is also supported in plug-ins that are not sandboxed.
An important design feature of tracing is that the tracing information is only displayed when an exception is passed from the plug-in or custom workflow activity back to the platform. If an exception is not thrown or is caught, no tracing information is displayed to the user.
An alternate approach would be to create a custom entity to track any run-time plug-in information that you want to record. When your plug-in executes, have the plug-in store its exception information in a record of your custom entity. In this way, you are logging your run-time plug-in information to the Microsoft DynamicsCRM database. This method works for any plug-in regardless of how it is registered. However, if the plug-in executes within the database transaction and an exception occurs that causes a transaction rollback, any entity data changes by the plug-in will be undone.
For more information about how to use tracing in your plug-in code, see Sample: Azure Aware Custom Plug-in. For more information about platform (ASP.NET based) tracing, see the Operating and Maintaining Guide, which is part of the Microsoft DynamicsCRM2011 Implementation Guide.
The tracing discussed here is different from ASP.NET tracing. Tracing is implemented in the Microsoft DynamicsCRM SDK through the use of the tracing service ITracingService. Developers addTrace statements to their plug-in code, then build and deploy the plug-in. During execution and only when that plug-in passes an exception back to the platform at run-time, tracing information is displayed to the user. For a synchronous registered plug-in, the tracing information is displayed in a dialog of the Microsoft DynamicsCRM Web application. For an asynchronous registered plug-in, the tracing information is shown in the Details area of the System Job form in the Web application. The amount and nature of this information is up to you as a developer to code into your plug-ins.
The main reason for implementing this type of tracing is to support the isolated (sandboxed) plug-in and custom workflow activities capability in Microsoft DynamicsCRM. Sandboxed plug-ins are not able to write information to the system event log or the file system. Tracing was implemented to provide sandboxed plug-ins and custom workflow activities with a means to output run-time information when an exception is thrown. In addition, tracing is also supported in plug-ins that are not sandboxed.
An important design feature of tracing is that the tracing information is only displayed when an exception is passed from the plug-in or custom workflow activity back to the platform. If an exception is not thrown or is caught, no tracing information is displayed to the user.
An alternate approach would be to create a custom entity to track any run-time plug-in information that you want to record. When your plug-in executes, have the plug-in store its exception information in a record of your custom entity. In this way, you are logging your run-time plug-in information to the Microsoft DynamicsCRM database. This method works for any plug-in regardless of how it is registered. However, if the plug-in executes within the database transaction and an exception occurs that causes a transaction rollback, any entity data changes by the plug-in will be undone.
For more information about how to use tracing in your plug-in code, see Sample: Azure Aware Custom Plug-in. For more information about platform (ASP.NET based) tracing, see the Operating and Maintaining Guide, which is part of the Microsoft DynamicsCRM2011 Implementation Guide.
See Also
Microsoft Dynamics CRM Plug in - Supported Message and Entities
| Message Name | Ownership Type | Message Availability | Entity Supported Deployment |
|---|---|---|---|
Assign
|
User-owned entities only
|
Server
|
Server
|
Create
|
User-owned and organization-owned entities
|
Both
|
Server
|
Delete
|
User-owned and organization-owned entities
|
Both
|
Server
|
GrantAccess
|
User-owned entities only
|
Server
|
Server
|
ModifyAccess
|
User-owned entities only
|
Server
|
Server
|
Retrieve
|
User-owned and organization-owned entities
|
Both
|
Server
|
RetrieveMultiple
|
User-owned and organization-owned entities
|
Both
|
Server
|
RetrievePrincipalAccess
|
User-owned entities only
|
Both
|
Server
|
RetrieveSharedPrincipalsAndAccess
|
User-owned entities only
|
Both
|
Server
|
RevokeAccess
|
User-owned entities only
|
Server
|
Server
|
SetState
|
User-owned and organization-owned entities
|
Both
|
Server
|
SetStateDynamicEntity
|
User-owned and organization-owned entities
|
Both
|
Server
|
Update
|
User-owned and organization-owned entities
|
Both
|
Server
|
Monday, August 19, 2013
Could not obtain exclusive lock on database 'model'. Retry the operation later. CREATE DATABASE failed. Some file names listed could not be created. Check related errors.
Restart Microsoft Dynamics CRM Deployment Manager and try again.
Friday, August 16, 2013
Microsoft Dynamics CRM - Creates base field automatically
The "Base" field gets generated when creating currency fields automatically. It stores the value corresponding to the base currency set in the system settings. This field can't be removed.
Jason Lattimer
When you´re creating money fields a "Base" value field will be added by default. "Base" field values will contain value in base currency in the system, while your money fields can contain values for selected currency.
Jason Lattimer
When you´re creating money fields a "Base" value field will be added by default. "Base" field values will contain value in base currency in the system, while your money fields can contain values for selected currency.
Tuesday, August 13, 2013
Microsoft Dynamics CRM 2011 Relationship Mapping
Original Post is http://www.powerobjects.com/blog/2012/06/26/microsoft-dynamics-crm-relationship-mappings-help-keep-customer-and-bill-to-customer-consistent/
Thanks JoeCRM for great post.
Recently, a Microsoft Dynamics CRM customer noticed a difference in functionality when creating a new Contract record and creating a new Contract record from a Contact. Today we’ll explore how this relates to CRM 2011 relationship mapping.
As you can see below when creating a new Contract record from the Contract entity and selecting the Customer the Bill To Customer field gets automatically filled.
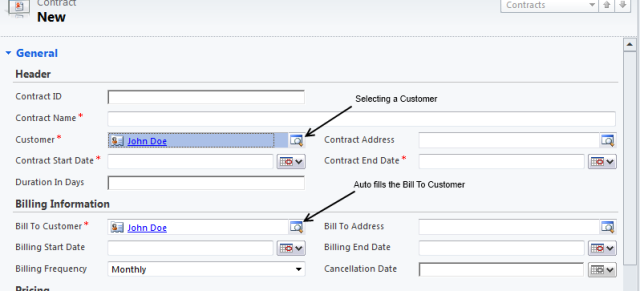
It’s a great out of the box feature to have since the Bill To Customer will most likely be the same as the Customer. But when you create a new Contract from the Contact record the same functionality doesn’t occur. Take a look:

This is because the OnChange event of the Customer field did not occur. Instead of adding JavaScript to the Contract form an easier way to keep the same functionality consistent is to use CRM 2011 Relationship Mapping.
To do this you customize the Contact’s entity one to many relationship to the Contract entity.

Then add a new Mapping that will map the Contact to the Bill To Customer field.

Now when a new Contract record is created from a Contact the same functionality will occur.
There you have it–how to use CRM 2011 relationship mapping. It’s easy to implement and no JavaScript is required. Just a handy little tip from your friendly CRM Expert.
Subscribe to:
Posts (Atom)